
Hi guys! In this post we will discuss how to get started with data binding in android for absolute beginners. As some of you are already aware of, data binding is actually part of Android's Jetpack components. By implementing data binding, you can get red of a lot of boilerplate code in android development. For example, you can completely get rid of all the messy view declarations using findviewbyid, setting text using settext() method etc.
So without further ado, we will jump into the coding part right away. First of all open your android studio ide and create a brand new android studio project with an empty activity as initial setup.
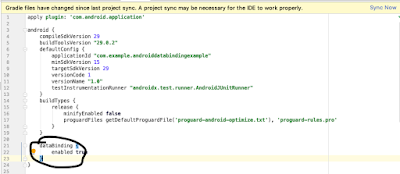
Next thing you will need is to enable data binding in your android project, which can be done by adding the following in your build.gradle file.
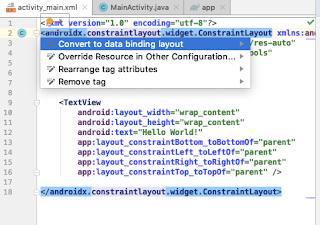
Now you will need to wrap the root layout of your activity(activity_main.xml) with the <layout> tag. You can do this either manually or just click the root layout of your activity's layout file to bring up the yellow bulb icon, clicking on which brings up the option "convert to data binding layout" and finally click on this option like shown below
As a result of selecting the above option, the layout will be converted like shown below
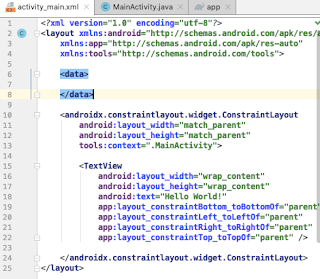
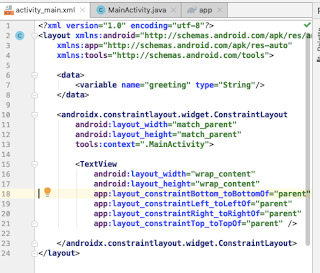
Now we can see that there is a <data> layout which is empty, so go ahead and add a <variable> tag inside it with some greeting data, say "Hello World!", so that the layout looks like :
Now the finishing touch to be made to our layout is to bind the greeting text variable to our textview, which can be done by adding @{greeting} to the textview's text attribute, also give an id to your textview, which we will later need in our layout's corresponding java file. So the final layout will look like the following :
Now that our layout setup for our data binding sample is done, let us head over to the java code. So, head over to your MainActivity.java file and initialise data binding by replacing setContentView(R.layout.activity_main); with binding= DataBindingUtil.setContentView(this,R.layout.activity_main);. As you are thinking right now, i have not yet declared the binding variable yet. Yes, I will show you how to do that.
Basically binding should be declared using a class that automatically gets generated as soon as we change the root layout of our layout file to <layout>. The so generated binding class will help us to identify various view items in our layout using the view's id.
For each layout with <layout> tag, the binding class will be generated in such a way that its name is generated from your layout file's name itself. It will have its name as all underscores removed and converting the letters succeeding the underscores as upper case, so if your layout file has a name like activity_main.xml ,then its corresponding binding file will be ActivityMainBinding . Now inside your onCreate(), below data binding initialisation, add this binding.setGreeting("Hello World"); to complete data binding process , see below for complete code,
You can see that the setter setGreeting() has got generated automatically since we have previously declared the variable "greeting" inside out layout file . Finally run the app to see the "Hello World" text printed on your screen.
So without further ado, we will jump into the coding part right away. First of all open your android studio ide and create a brand new android studio project with an empty activity as initial setup.
Next thing you will need is to enable data binding in your android project, which can be done by adding the following in your build.gradle file.
dataBinding {now hit sync now button in top right corner like shown below
enabled true
}

Now you will need to wrap the root layout of your activity(activity_main.xml) with the <layout> tag. You can do this either manually or just click the root layout of your activity's layout file to bring up the yellow bulb icon, clicking on which brings up the option "convert to data binding layout" and finally click on this option like shown below

As a result of selecting the above option, the layout will be converted like shown below

Now we can see that there is a <data> layout which is empty, so go ahead and add a <variable> tag inside it with some greeting data, say "Hello World!", so that the layout looks like :

Now the finishing touch to be made to our layout is to bind the greeting text variable to our textview, which can be done by adding @{greeting} to the textview's text attribute, also give an id to your textview, which we will later need in our layout's corresponding java file. So the final layout will look like the following :
Now that our layout setup for our data binding sample is done, let us head over to the java code. So, head over to your MainActivity.java file and initialise data binding by replacing setContentView(R.layout.activity_main); with binding= DataBindingUtil.setContentView(this,R.layout.activity_main);. As you are thinking right now, i have not yet declared the binding variable yet. Yes, I will show you how to do that.
Basically binding should be declared using a class that automatically gets generated as soon as we change the root layout of our layout file to <layout>. The so generated binding class will help us to identify various view items in our layout using the view's id.
For each layout with <layout> tag, the binding class will be generated in such a way that its name is generated from your layout file's name itself. It will have its name as all underscores removed and converting the letters succeeding the underscores as upper case, so if your layout file has a name like activity_main.xml ,then its corresponding binding file will be ActivityMainBinding . Now inside your onCreate(), below data binding initialisation, add this binding.setGreeting("Hello World"); to complete data binding process , see below for complete code,
You can see that the setter setGreeting() has got generated automatically since we have previously declared the variable "greeting" inside out layout file . Finally run the app to see the "Hello World" text printed on your screen.
Excellent, simple!
ReplyDeletethanks for the feedback, Ashik
Delete