Dedicated Server

Jetpack compose tutorial in Kotlin(Android) to fetch list of items from remote api

Fetching and Displaying Items with Jetpack Compose - Kotlin App

In this tutorial, we'll create a Jetpack Compose app in Kotlin that fetches a list of items from a remote API and displays them using a Compose UI.

Let's get started!

Step 1: Set up the Project

Create a new Android project in Android Studio with a minimum SDK version of 21 and select the Kotlin language. Make sure you have the latest version of the Android Gradle Plugin and Kotlin plugin installed.

Step 2: Add Dependencies

In your project's build.gradle file, add the following dependencies:


dependencies {
    // Jetpack Compose
    implementation 'androidx.activity:activity-compose:1.4.0-beta01'
    implementation 'androidx.compose.ui:ui:1.1.0-alpha05'
    implementation 'androidx.compose.material:material:1.1.0-alpha05'
    implementation 'androidx.compose.runtime:runtime:1.1.0-alpha05'
    implementation 'androidx.compose.foundation:foundation:1.1.0-alpha05'

    // Networking
    implementation 'io.ktor:ktor-client-android:1.7.0'
    implementation 'io.ktor:ktor-client-serialization-jvm:1.7.0'
    implementation 'org.jetbrains.kotlinx:kotlinx-serialization-json:1.3.1'
}

Step 3: Define the Item Model

Create a new Kotlin data class to represent the item (e.g., Post for this example):


@Serializable
data class Post(val id: Int, val userId: Int, val title: String, val body: String)

Step 4: Create the API Service

Create a new Kotlin file named ApiService.kt and add the following code:


import io.ktor.client.*
import io.ktor.client.features.json.*
import io.ktor.client.request.*
import kotlinx.serialization.Serializable

object ApiService {
    private val httpClient = HttpClient {
        install(JsonFeature) {
            serializer = KotlinxSerializer()
        }
    }

    suspend fun getPosts(): List<Post> {
        return httpClient.get("https://jsonplaceholder.typicode.com/posts")
    }
}

Step 5: Create the Composable Function

Update the existing Kotlin file containing the Composable function (e.g., MainActivity.kt) with the following code:


import androidx.compose.foundation.lazy.LazyColumn
import androidx.compose.foundation.lazy.items
import androidx.compose.material.MaterialTheme
import androidx.compose.material.Text
import androidx.compose.runtime.Composable
import androidx.compose.ui.tooling.preview.Preview
import kotlinx.coroutines.Dispatchers
import kotlinx.coroutines.GlobalScope
import kotlinx.coroutines.launch

@Composable
fun PostList(posts: List<Post>) {
    LazyColumn {
        items(posts) { post ->
            Text(text = "Post ${post.id}", style = MaterialTheme.typography.h6)
            Text(text = post.title, style = MaterialTheme.typography.body1)
            Text(text = post.body, style = MaterialTheme.typography.body2)
        }
    }
}

@Preview
@Composable
fun PreviewPostList() {
    val previewPosts = listOf(
        Post(1, 1, "Title 1", "Content 1"),
        Post(2, 2, "Title 2", "Content 2"),
        Post(3, 3, "Title 3", "Content 3")
    )
    PostList(posts = previewPosts)
}

Step 6: Create the MainActivity

Update the existing MainActivity.kt file with the following code:


import android.os.Bundle
import androidx.activity.compose.setContent
import androidx.appcompat.app.AppCompatActivity
import kotlinx.coroutines.Dispatchers
import kotlinx.coroutines.GlobalScope
import kotlinx.coroutines.launch

class MainActivity : AppCompatActivity() {
    override fun onCreate(savedInstanceState: Bundle?) {
        super.onCreate(savedInstanceState)

        // Fetch the posts from the API
        GlobalScope.launch(Dispatchers.Main) {
            val posts = ApiService.getPosts()

            // Display the posts using Jetpack Compose
            setContent {
                PostList(posts = posts)
            }
        }
    }
}

Step 7: Run the App

Build and run your app on an Android device or emulator. You should see the list of posts fetched from the JSONPlaceholder API displayed in a Compose UI.

That's it! You've successfully created a Jetpack Compose app in Kotlin that fetches and displays a list of posts from a remote API.

I hope this tutorial was helpful. Happy coding!

Building a Notes App for Android(Kotlin) using MVVM Architecture, Koin DI, and Room Library

Notes App for Android with Kotlin, MVVM, Koin DI, and Room

1. Create a new Android project

Create a new Android project in Android Studio with the package name com.example.buildianotes.

2. Set up dependencies

Set up the necessary dependencies in the build.gradle files.

Top-level build.gradle


buildscript {
    ext.kotlin_version = '1.5.21'
    // Add other dependencies if needed
}

allprojects {
    repositories {
        // Add necessary repositories
        google()
        jcenter()
    }
}
  

App-level build.gradle


plugins {
    id 'com.android.application'
    id 'kotlin-android'
    id 'kotlin-kapt'
}

android {
    compileSdkVersion 30
    defaultConfig {
        applicationId "com.example.buildianotes"
        minSdkVersion 21
        targetSdkVersion 30
        versionCode 1
        versionName "1.0"
        testInstrumentationRunner "androidx.test.runner.AndroidJUnitRunner"
    }

    // Add necessary configurations

    buildTypes {
        release {
            // Add necessary configurations
        }
    }
}

dependencies {
    implementation fileTree(dir: 'libs', include: ['*.jar'])
    implementation "org.jetbrains.kotlin:kotlin-stdlib:$kotlin_version"

    // Room
    implementation "androidx.room:room-runtime:2.4.0"
    kapt "androidx.room:room-compiler:2.4.0"

    // Koin
    implementation "org.koin:koin-androidx-viewmodel:3.2.0"

    // Add other necessary dependencies
}
  

3. Create the data model

Create the data model for the Note entity. Create a new Kotlin class called Note in the com.example.buildianotes.model package.


package com.example.buildianotes.model

import androidx.room.Entity
import androidx.room.PrimaryKey

@Entity(tableName = "notes")
data class Note(
    @PrimaryKey(autoGenerate = true) val id: Long = 0,
    val title: String,
    val content: String
)
  

4. Create the Room DAO

Create a new Kotlin file called NotesDao in the com.example.buildianotes.data package for defining the Room DAO (Data Access Object) interface.


package com.example.buildianotes.data

import androidx.lifecycle.LiveData
import androidx.room.*

@Dao
interface NotesDao {
    @Query("SELECT * FROM notes")
    fun getAllNotes(): LiveData<List<Note>>

    @Insert(onConflict = OnConflictStrategy.REPLACE)
    suspend fun insertOrUpdate(note: Note)

    @Delete
    suspend fun delete(note: Note)
}
  

5. Create the Room database

Create a new Kotlin file called NotesDatabase in the com.example.buildianotes.data package to define the Room database.


package com.example.buildianotes.data

import android.content.Context
import androidx.room.Database
import androidx.room.Room
import androidx.room.RoomDatabase
import com.example.buildianotes.model.Note

@Database(entities = [Note::class], version = 1)
abstract class NotesDatabase : RoomDatabase() {
    abstract fun notesDao(): NotesDao

    companion object {
        @Volatile
        private var INSTANCE: NotesDatabase? = null

        fun getInstance(context: Context): NotesDatabase {
            return INSTANCE ?: synchronized(this) {
                val instance = Room.databaseBuilder(
                    context.applicationContext,
                    NotesDatabase::class.java,
                    "notes_database"
                ).build()
                INSTANCE = instance
                instance
            }
        }
    }
}
  

6. Create the data repository

Create a new Kotlin file called NotesRepository in the com.example.buildianotes.data package to handle data operations.


package com.example.buildianotes.data

import androidx.lifecycle.LiveData
import com.example.buildianotes.model.Note

class NotesRepository(private val notesDao: NotesDao) {
    val allNotes: LiveData<List<Note>> = notesDao.getAllNotes()

    suspend fun insertOrUpdate(note: Note) {
        notesDao.insertOrUpdate(note)
    }

    suspend fun delete(note: Note) {
        notesDao.delete(note)
    }
}
  

7. Create the ViewModel

Create a new Kotlin file called NotesViewModel in the com.example.buildianotes.viewmodel package to implement the ViewModel.


package com.example.buildianotes.viewmodel

import androidx.lifecycle.LiveData
import androidx.lifecycle.ViewModel
import androidx.lifecycle.viewModelScope
import com.example.buildianotes.data.NotesRepository
import com.example.buildianotes.model.Note
import kotlinx.coroutines.launch

class NotesViewModel(private val notesRepository: NotesRepository) : ViewModel() {
    val allNotes: LiveData<List<Note>> = notesRepository.allNotes

    fun insertOrUpdate(note: Note) {
        viewModelScope.launch {
            notesRepository.insertOrUpdate(note)
        }
    }

    fun delete(note: Note) {
        viewModelScope.launch {
            notesRepository.delete(note)
        }
    }
}
  

8. Set up dependency injection with Koin

Create a new Kotlin file called AppModule in the com.example.buildianotes.di package to define the dependency injection with Koin.


package com.example.buildianotes.di

import com.example.buildianotes.data.NotesDatabase
import com.example.buildianotes.data.NotesRepository
import com.example.buildianotes.viewmodel.NotesViewModel
import org.koin.androidx.viewmodel.dsl.viewModel
import org.koin.dsl.module

val appModule = module {
    single { NotesDatabase.getInstance(get()) }
    single { get<NotesDatabase>().notesDao() }
    single { NotesRepository(get()) }
    viewModel { NotesViewModel(get()) }
}
  

9. Initialize Koin in the Application class

In your Application class, initialize Koin with the AppModule in the onCreate() method. Create a new Kotlin file called NotesApp in the com.example.buildianotes package.


package com.example.buildianotes

import android.app.Application
import com.example.buildianotes.di.appModule
import org.koin.android.ext.koin.androidContext
import org.koin.core.context.startKoin

class NotesApp : Application() {
    override fun onCreate() {
        super.onCreate()
        startKoin {
            androidContext(this@NotesApp)
            modules(appModule)
        }
    }
}
  

10. Create the UI for displaying and managing notes

Create an activity or fragment for displaying and managing the notes. For example, create a new Kotlin file called NotesActivity in the com.example.buildianotes.ui package.


package com.example.buildianotes.ui

import android.os.Bundle
import androidx.appcompat.app.AppCompatActivity
import androidx.lifecycle.Observer
import androidx.recyclerview.widget.LinearLayoutManager
import com.example.buildianotes.R
import com.example.buildianotes.model.Note
import com.example.buildianotes.viewmodel.NotesViewModel
import kotlinx.android.synthetic.main.activity_notes.*
import org.koin.androidx.viewmodel.ext.android.viewModel

class NotesActivity : AppCompatActivity() {
    private val notesViewModel: NotesViewModel by viewModel()
    private val notesAdapter = NotesAdapter()

    override fun onCreate(savedInstanceState: Bundle?) {
        super.onCreate(savedInstanceState)
        setContentView(R.layout.activity_notes)

        setupRecyclerView()
        observeNotes()

        fabAddNote.setOnClickListener {
            // Handle click event to add a new note
        }
    }

    private fun setupRecyclerView() {
        rvNotes.apply {
            layoutManager = LinearLayoutManager(this@NotesActivity)
            adapter = notesAdapter
        }
    }

    private fun observeNotes() {
        notesViewModel.allNotes.observe(this, Observer { notes ->
            notesAdapter.submitList(notes)
        })
    }
}
  

11. Create the RecyclerView adapter

Finally, create the NotesAdapter class to handle the RecyclerView in the com.example.buildianotes.ui package.


package com.example.buildianotes.ui

import android.view.LayoutInflater
import android.view.View
import android.view.ViewGroup
import androidx.recyclerview.widget.DiffUtil
import androidx.recyclerview.widget.ListAdapter
import androidx.recyclerview.widget.RecyclerView
import com.example.buildianotes.R
import com.example.buildianotes.model.Note
import kotlinx.android.synthetic.main.item_note.view.*

class NotesAdapter : ListAdapter<Note, NotesAdapter.NoteViewHolder>(NoteDiffCallback()) {
    override fun onCreateViewHolder(parent: ViewGroup, viewType: Int): NoteViewHolder {
        val view = LayoutInflater.from(parent.context).inflate(R.layout.item_note, parent, false)
        return NoteViewHolder(view)
    }

    override fun onBindViewHolder(holder: NoteViewHolder, position: Int) {
        val note = getItem(position)
        holder.bind(note)
    }

    inner class NoteViewHolder(itemView: View) : RecyclerView.ViewHolder(itemView) {
        fun bind(note: Note) {
            itemView.tvTitle.text = note.title
            itemView.tvContent.text = note.content
        }
    }

    class NoteDiffCallback : DiffUtil.ItemCallback<Note>() {
        override fun areItemsTheSame(oldItem: Note, newItem: Note): Boolean {
            return oldItem.id == newItem.id
        }

        override fun areContentsTheSame(oldItem: Note, newItem: Note): Boolean {
            return oldItem == newItem
        }
    }
}
  

Conclusion

Congratulations! You have successfully created a Notes app for Android using Kotlin, MVVM architecture, Koin DI, and Room. This app allows you to store and manage notes using a local database.

Feel free to customize the app further by adding more features, such as editing and deleting notes, adding labels or categories, implementing search functionality, and adding authentication.

Pick contacts from Android Contacts using runtime permission check

Hey Guys! In this post, we will see how to pick a contact from android's contacts app and then show it inside our app. As you might already know, the permission needed for reading contacts, i.e,  Manifest.permission.READ_CONTACTS is  categorised under dangerous permission. So for such category of permissions, it is made mandatory that we request the permission once more at runtime, even though the permission is already added in AndroidManifest.xml. Enough of the details, we will jump into the code right away.

Before we begin just keep in mind that i will be using (data binding/view binding) in this app

Next, fire open your android studio and create a new project with an "Empty Activity" template.

As discussed, enable data binding by heading over to your app level build.gradle and adding the following within android {..}

dataBinding {
    enabled = true}

Now that we are all set with binding, we will see how to setup our layout file. So within your layout folder, find your activity's layout(named as activity_main.xml if you kept the activity name as default during project setup) . Now make the following changes to it
You can see that i have converted the above layout to a data binding layout by wrapping the root layout with a "<layout>" tag. 
Also, you may choose some images to be set to your AppCompatImageButton, you can either get the one i used by downloading the source code below, or grab some free images from google. Now you will be able to reference the views defined in this layout, directly by using their id without using findviewbyid method. Also, you need to add two edittexts - one for contact name and another one for contact phone. Also create a button to pick the contact from your device contact app.

Now update your MainActivity.java file as shown below


As shown above, you can initialise data binding library by using 
binding= DataBindingUtil.setContentView(this,R.layout.activity_main); and then use it to reference views like binding.nameEdtbinding.phoneEdtbinding.pickContact etc

As shown above, you can check for runtime permissions when the button is clicked, then if the permission is already granted take the user to the contacts picking screen, otherwise show the permission dialog. If the user grants the contacts read permission through this dialog, take him to the contacts picking screen, otherwise if he rejects, then prevent him/her from picking the contact.

Now that you are all set, if you try running the project you will see a similar output as shown below.

Picking contacts after checking runtime permission


Checkout full project source code here

Android viewpager with tab layout example

In this post i will walk you through the setup of a tab layout with view pager, the final output will be something like the one shown below. We will also see how to pass data to the viewpager fragments from the activity.

viewpager with tab layout
Before we begin, couple of things that we will be following in this project are

  • The app will be built using androidx packages
  • The app will be using Java 8
  • The app will be using data binding (part of android jetpack components)

Now that we are all set to begin, let us open up android studio and create a brand new project with androidx artifacts.

androidx artifacts are configured by default when you create a new AS project
Now that your project have successfully synced with gradle, head over to your app level build.gradle and enable java 8 by adding the following code

compileOptions {
compileOptions {
targetCompatibility JavaVersion.VERSION_1_8 sourceCompatibility JavaVersion.VERSION_1_8 }
}
Also, you can enable data binding by adding the following to your app level build.gradle

dataBinding {
enabled = true}

Also add the following material dependency inorder to support tab layout

implementation 'com.google.android.material:material:1.0.0'

Now the resulting build.gradle will look like the following

Now that the initial setup is done, we will jump into the coding section right away.

First of all, in the project explorer, right click on your package directory, then create a blank fragment like shown below

create new blank fragment

Now that i have added the blank fragment, head over to your activity layout(acitvity_main.xml in my case) and convert it into a databinding layout by wrapping the root layout with <layout> tag, so that the resulting layout will be 


Now head over to your activity's java file (MainActivity.java in my case) and initialise binding variable by adding binding= DataBindingUtil.setContentView(this,R.layout.activity_main);, now you can get the binding variable for this initialisation by making slight modification to your layout file name, so in my case acticity_main becomes ActivityMainBinding. So initialise your bindining variable like this private ActivityMainBinding binding;

Now inorder to assign different fragments  in viewpager, we will need a viewpager adapter, for that go inside your MainActivity.java and add a new adapter class like shown below


If you check the activity_main.xml above, you can see that i have already added viewpager and tab layout inside it. I have also assigned the id's tab to tab layout and viewPager to the viewpager. Now is the part where view binding comes into play, can reference the viewpager and tab layout in our java code simply by using binding.viewPagerbinding.tab etc.

Now we can easily pass our viewpager to the SamplePagerAdapter and also setup our viewpager with the tablayout. Inside the SamplePagerAdapter's getItem() method you can return different fragments, which will be showing up inside your viewpager as different tabs. You can also return the titles for each tab in the getPageTitle() method

Now the complete code for MainActivity.java will be like
everything is now set and you will be able to see the tabbed viewpager if you hit the run button.
Download full source code below :

Android data binding tutorial for absolute beginners

Hi guys! In this post we will discuss how to get started with data binding in android for absolute beginners. As some of you are already aware of,  data binding is actually part of Android's Jetpack components. By implementing data binding, you can get red of a lot of boilerplate code in android development. For example, you can completely get rid of all the messy view declarations using findviewbyid, setting text using settext() method etc.

So without further ado, we will jump into the coding part right away. First of all open your android studio ide and create a brand new android studio project with an empty activity as initial setup.

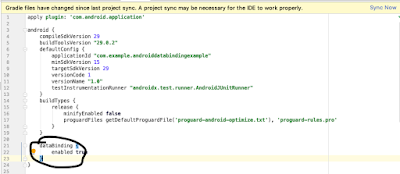
Next thing you will need is to enable data binding in your android project, which can be done by adding the following in your build.gradle file.

dataBinding {
 enabled true
 }
now hit sync now button in top right corner like shown below


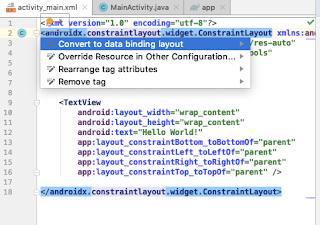
Now you will need to wrap the root layout of your activity(activity_main.xml) with the <layout> tag. You can do this either manually or just click the root layout of your activity's layout file to bring up the yellow bulb icon, clicking on which brings up the option "convert to data binding layout" and finally click on this option like shown below


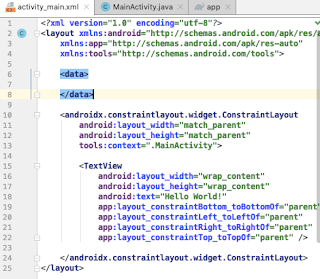
As a result of selecting the above option, the layout will be converted like shown below


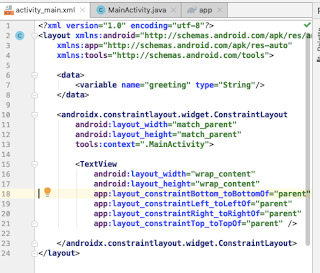
Now we can see that there is a <data> layout which is empty, so go ahead and add a <variable> tag inside it with some greeting data, say "Hello World!", so that the layout looks like :


Now the finishing touch to be made to our layout is to bind the greeting text variable to our textview, which can be done by adding @{greeting} to the textview's text attribute, also give an id to your textview, which we will later need in our layout's corresponding java file. So the final layout will look like the following :


Now that our layout setup for our data binding sample is done, let us head over to the java code. So, head over to your MainActivity.java file and initialise data binding by replacing setContentView(R.layout.activity_main); with binding= DataBindingUtil.setContentView(this,R.layout.activity_main);. As you are thinking right now, i have not yet declared the binding variable yet. Yes, I will show you how to do that.

Basically binding should be declared using a class that automatically gets generated as soon as we change the root layout of our layout file to <layout>. The so generated binding class will help us to identify various view items in our layout using the view's id.

For each layout with <layout> tag, the binding class will be generated in such a way that its name is generated from your layout file's name itself. It will have its name as all underscores removed and converting the letters succeeding the underscores as upper case, so if your layout file has a name like activity_main.xml ,then its corresponding binding file will be ActivityMainBinding . Now inside your onCreate(), below data binding initialisation, add this binding.setGreeting("Hello World"); to complete data binding process , see below for complete code,

You can see that the setter setGreeting() has got generated automatically since we have previously declared the variable "greeting" inside out layout file . Finally run the app to see the "Hello World" text printed on your screen.

Easily share text from your android phone to pc and from pc to phone

Hi guys, in this post i would like to introduce you to one of my apps which could help you in easily transferring text from your android phone to a pc or any other device which has a web browser. So without further ado, we will checkout the app.


The app is called Reader'S Checkpoints (RSC) and you can download it for free from playstore by clicking the below button
Get it on Google Play

SENDING TEXT FROM ANDROID PHONE TO PC

Once you have finished installing the app, you can select a random text from any other app like google chrome, notes app or any other app which allows you to copy text.

"SEND TO PC" option appears after installing Reader's Checkpoints(RSC)


Now, once you select the text, you will see one more option along with copy, paste options. This new new option will be "SEND TO PC" as shown in above image. This option comes as part of Reader'S Checkpoints (RSC) app.


Once you click this option the QR code scanner will open. Now open the website http://rscweb.in and scan the QR code that appears on this website using the scanner that just appeared on your smartphone.


As a result of the scan, the selected text will be instantly shared to your pc's web browser


SENDING TEXT FROM PC TO ANDROID PHONE

First of all copy some random text on your pc and then head over to the website http://rscweb.in. In the website click on "SEND TEXT TO PHONE"

Now you will see a field to enter the text which needs to be send to your android phone, paste the copied random text here and then click on generate QR, a random QR code will be generated which we will need to scan from our Reader'S Checkpoints (RSC) app, as a result of which the copied text will be available in our android phone instantly.


Inorder to scan the qr code from our app, first of all fire open Reader'S Checkpoints (RSC) app,  then click on add new note "+" icon on the bottom, and the in the further screen that appears click on the pc icon that is present on the top right corner to fire open the qr code scanner as shown below.


You can see that the text from your pc has been share to your android phone as soon as the scan is complete.

Android Recyclerview Tutorial with SQLite ROOM : using MVVM, Dagger 2

What we will be building ?


A simple note taking app, which will have option to add notes and delete it. This will be a minimal design tutorial and hence we won't be spending much time on the app UI. This tutorial will be more focused on the MVVM, dagger2 and building an overall app architecture. This app will be improved in upcoming tutorials with more features, so make sure to stay tuned for that as well.

What are we will be covering ?

We will be using Java 8 to get access to various features like lambda functions, so we will need to enable this in app level build.gradle

We will be making use of data binding, so we will need to enable this also on your app level build.gradle

We will be using Dagger2 for building our dependencies

We will be having a base activity class which will be responsible for performing redundant operations like dependency injection, data binding, setting viewmodels for activities etc. So basically this app structure is developed with more activities to be incorporated in future.

The main reason for choosing MVVM and live data is that, with this pattern database operations like insert, delete gets effortlessly simple. We just need to observe to the database changes and as a result all the UI changes is reflected on the go. There are more advantages to this pattern, we will discuss these while moving forward.

Getting started with project building :

First of all, open your android studio, in file go to new>> new project and then create a project with empty activity

Dependencies Required ?

First of all update project level build.gradle as show below. Here we have set the versions for some dependencies that we will be using in our app :

Now go ahead and update your app level build.gradle with  dependencies for recyclerview,cardview,dagger,room,livedata etc as shown below :


As shown above we have enabled databinding by adding this

dataBinding {
enabled = true}

Also enable java 8 as shown below

compileOptions {
sourceCompatibility JavaVersion.VERSION_1_8
targetCompatibility JavaVersion.VERSION_1_8}


Now let us jump into the coding session right away. Now, since we are making a notes app we will need to make a note model class. So in terms of SQLite ROOM, we will call this an entity. Entities in room are just another java class which is annotated with @Entity annotation. Annotating a class like this will help room in identifying it as an SQLite table. So now our room entity/table will have an notesId field which will be auto incremented on insertion, a notesTitle field and a notesDesc filed. We will be naming our table as notes_model which will be provided in brackets along with the @Entity annotation. So create a class like the following and name it NotesModel.java

Now go ahead and create a DAO class, by annotating it with @Dao. This class will basically act as an interface which will query the sqlite database as per our request. It will contain the various sql queries like insert,delete etc, now name it as NotesDao.java


Now it is time to create our database class, which should be annotated with @Database. Inside the annotation arguments, we can provide an array of entities where we can provide a list of tables/entities that we need inside our database, but for now we will be giving a single entity/table name which is NotesModel and we will keep the database version as 1 . So create the database class as follows :

It is now time to create our NotesRepository which will provide us with the live/updated database changes. It is where we define our live data methods from our db which will be later observed in activity. So create the repository as shown below and name it as NotesRepository.java

You might have noted the @Inject in the constructor which means that we will be getting these dependencies using dagger2, we will see how to create these dependencies using dagger2 later in this tutorial

Now create an abstract class BaseViewModel from which we will be extending all the viewmodel classes

Now we will need tocreate a viewmodel class for our MainActivity, so create MainActivityVM.java  like below

Now we will be creating the BaseActivity.java and make it abstract from which all our activties will be extending from. Also our BaseActivity.java will accept generic params for ViewDataBinding,BaseViewModel etc which means that the respective activities will be supplying our base activity with these params as required so that all databinding, setting viewmodels etc happens in the baseactivity itself.

We will also be using abstract methods for getting binding variable,activity layout, and viewmodel from respective activities. These abstract methods are getBindingVariable(),getLayoutId(),getViewModel() respectively.
now that we have all required attributes for databinding and dependency injection, we can create BaseActivity.java like following :


Now update your layout file which is present in res>> layout>>activity_main.xml , as shown below :

Now add a new layout file for the add new note dialog and name it custom_dialog_with_btns_view.xml


Now goto the project explorer on left hand side of your screen and right click on your package directory and create a new package named "di". This is to organize all your dagger files in this directory, it is optional to create a directory like this but it is highly recommended so that the code becomes more understandable.

Now right click on the di directory, and create a new abstract class and name it ActivityModule.java

In the above class you might have noticed the annotation @Module  which means that this class is a module and in this case this module will be used to provide various activities in our app like MainActivity. All the future generated activities must be defined here.

Now in the same directory - di, we will need the custom annotation ViewModelKey to generate our ViewModelModule.java . So first create interface ViewModelKey.java as follows

Now in the di directory, create another abstract class with @Module annotation and name it as ViewModelModule.java . This module class will provide all the ViewModels in the project. All the ViewModels should be defined here


Create another @Module annotated class AppModule.java which has included module as ViewModelModule.class as follows

Now you will need to design the view for note item, so go to res>>layout, right click on layout directory and click create new layout resource file and name it notes_item_view and add below contents to it

In the above layout for the recyclerview adapter, we have used data binding to set text into the textview. Basically, inorder to perform data binding, we need to make the root layout as "<layout>", also you will need to import the NotesModel and assign it to a variable as shown below.
<data>
<import type="com.example.recyclerviewsqliteroomcrud.persistance.NotesModel"/>
<variable
name="itemModel"
type="NotesModel" />
</data>
Now create a recyclerview adapter like shown below, also you will need to bind the above layout with this adapter in the viewholder

Now update your MainActivity.java  like show below


As shown above we have injected the MainActivityVM. Also we have returned the viewmodel(MainActivityVM) and layout file(activity_main) to the BaseActivity so that we can perform databinding and viewmodel setup inside the BaseActivity itself. This process will apply to all future activities that may be created in the app.
Now we will need to create a component class which will be used along with the earlier created module classes to generate the dependencies using dagger. So create AppComponent.java as shown below :


Now as a final step,we will need to generate the application class which will initialize dagger to build the necessary dependencies. So create BaseApplication.java

As soon as you copy the above file you may notice that DaggerAppComponent is given in red and shows error. This is because dagger has not yet generated the dependencies, inorder to do that click on File>>Sync project with gradle files . If everything goes well, the error will be gone and you may then organize the project structure as shown below(optional)


Finally, go to AndroidManifest.xml and update the application name as .BaseApplication as shown below


You may also checkout the below video tutorial which shows how and example with recyclerview,mvvm,dagger2,retrofit2